For the month of August, my fellow teammates and I have been challenged to create 13 fall-themed cards. This theme can include fall/autumn, back to school, Thanksgiving, or Halloween.
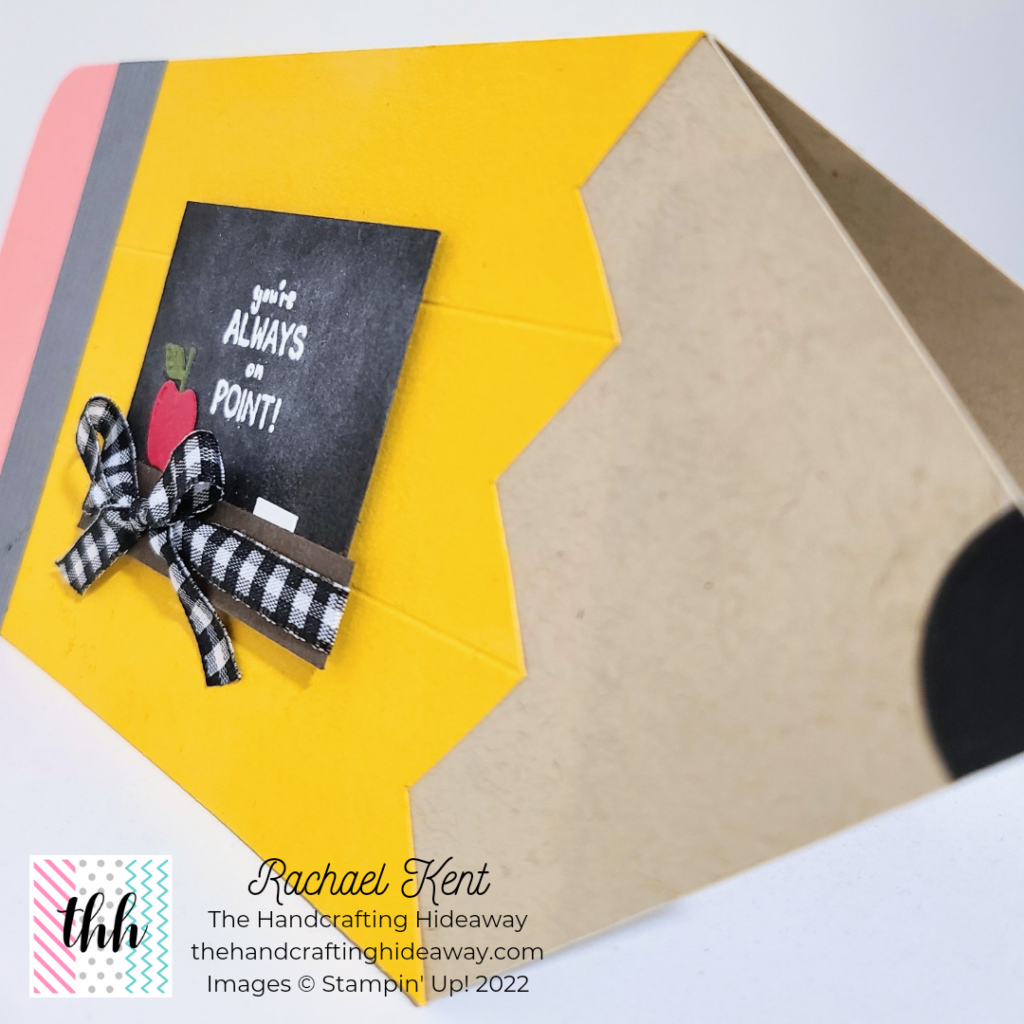
For card #5 of 13, I chose to create a Back to School themed card in the shape of a pencil. I thought this would be perfect for any students or teachers out there! I will definitely be making some of these for my kids’ teachers this year!
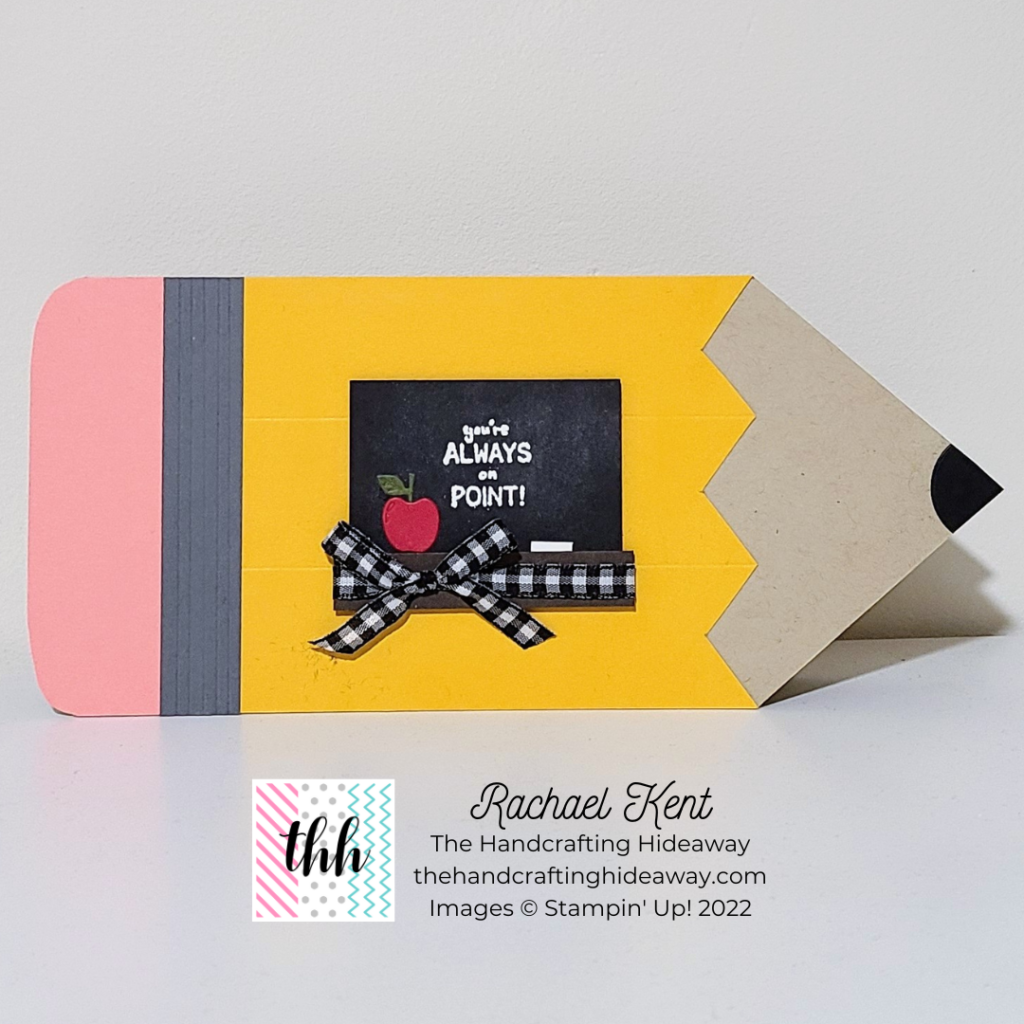
The sentiment “you’re always on point!” is from the Hippest Hippos stamp set which is in the 2022 Sale-A-Bration catalog. During Sale-A-Bration you can earn free items for every $50 or $100 you spend! This stamp set is one that is FREE with a $50 purchase and is only available until August 31st, 2022 and while supplies last. Scroll down to the bottom of this post to access links to every item used in this card.
Supplies Needed:
- Stamps:
- Hippest Hippos
- Cardstock:
- Basic Black – 2-1/2″ x 2″ for chalkboard and a scrap for the 1″ circle die cut
- Basic Gray – 4″ x 3/4″
- Basic White – tiny scrap for chalk
- Cherry Cobbler – small scrap for die cut apple
- Crumb Cake – 9″ x 8″; score at 4″ (final dimensions after folding are 9″ x 4″)
- Crushed Curry – 5″ x 4″
- Early Espresso – 2-5/8″ x 1/2″
- Flirty Flamingo – 4″ x 1-5/8″
- Mossy Meadow – small scrap for die cut stem/leaf of apple
- Ink:
- Versamark Pad
- Dies:
- Beautiful Shapes Dies
- Full Basket Dies
- Embellishments:
- White Embossing Powder
- Black & White 1/4″ Gingham Ribbon
- Tools:
- Paper Trimmer
- Paper Snips
- Heat Tool
- Stampin Cut & Emboss Machine
- Adhesives:
- Stampin Seal
- Fine Tip Glue Pen
- Stampin’ Dimensionals
Card Instructions:
- Cut all cardstock and die cuts.
- Cut the cardstock pieces to the dimensions given in the supplies list above.
- On the Crumb Cake piece, score at 4″ running lengthwise. Fold on the scored line. Measure 2-1/2″ from right side and make a pencil mark at the edges of the card. Make a pencil mark halfway along the short edge a 2″. Cut diagonally between the pencil marks. This creates the point of the pencil. Using Paper Snips, slightly round the corners of the other end of the pencil where the eraser will be.
- On the Crushed Curry piece, score two lines running lengthwise equally distanced apart. Put a pencil mark half way in between each scored line at 1/2″ in from the edge. Cut diagonally from the corners to the pencil marks and from the scored lines to the pencil marks. This creates the zigzag pattern.
- On the Basic Gray piece, score 5 lines equally running lengthwise distanced apart.
- Using the Full Basket Dies, cut an apple from a scrap of Cherry Cobbler and cut the small stem/leaf from a scrap of Mossy Meadow.
- Using the 1″ circle die from the Beautiful Shapes Dies, cut a circle from a scrap of Basic Black.
- Cut a small scrap of Basic White for the chalk.
- Adhere pieces together.
- Adhere Flirty Flamingo piece at the left edge of the pencil. Trim the excess to match the rounded corners.
- Adhere the Crushed Curry piece to the right of the Flirty Flamingo piece, so their edges touch.
- Adhere the Basic Gray piece centered on top of the seam where the Flirty Flamingo and Crushed Curry pieces touch.
- Adhere the Basic Black die cut circle to the point of the pencil, so the point of the pencil lands at the center of the circle. This becomes the lead of the pencil. Trim the excess to match the point of the card base.
- Using Stampin’ Seal, adhere the Early Espresso piece centered at the bottom the the Basic Black rectangle piece.
- Using the Fine Tip Glue Pen, adhere the die cut apple and stem/leaf and the small chalk piece above the Early Espresso piece, so it looks like theybare sitting on the ledge of the chalkboard.
- Stamp the sentiment.
- Using the Versamark ink pad, stamp the sentiment centered on the Basic Black chalkboard. Put White Embossing Powder on top. Tap off the excess and use the Heat Tool to emboss the sentiment.
- Embellish.
- Cut a long enough piece of Black & White 1/4″ Gingham Ribbon to allow it wrap around the bottom of the chalkboard and tie a bow.
- Put dimensionals on the back of the chalkboard and adhere it centered on the Cryshed Curry part of the pencil.
Thank you so much for stopping by today! As always, make sure to live life creatively!
♥ Rachael Kent ♥
- Shop with Rachael
- August Host Code: 7ZW2SYR9
- August Host Code
- Gift: NEW Fine Sparkle Adhesive Backed Gems (w/$65 order)
- Become a Paper Pumpkin Subscriber
- Join my Happy Handcrafters Team – $99 Starter Kit (You’ll get $125 worth of products for only $99!)
Stamping Supplies I used: (click on the products below to shop online)
")


 Gingham Ribbon")


")


3 Comments
Love your card ❤️!! TFS the picture and recipe!!
This is so cute!!
Cute card, great directions. You have a couple of misspelled words, but the instructions are GREAT. Any teacher would love to get one of these!