The DO Stamper STARS are having a Christmas in July Inspiration Blog Hop! Can you believe we are already halfway through the year?!

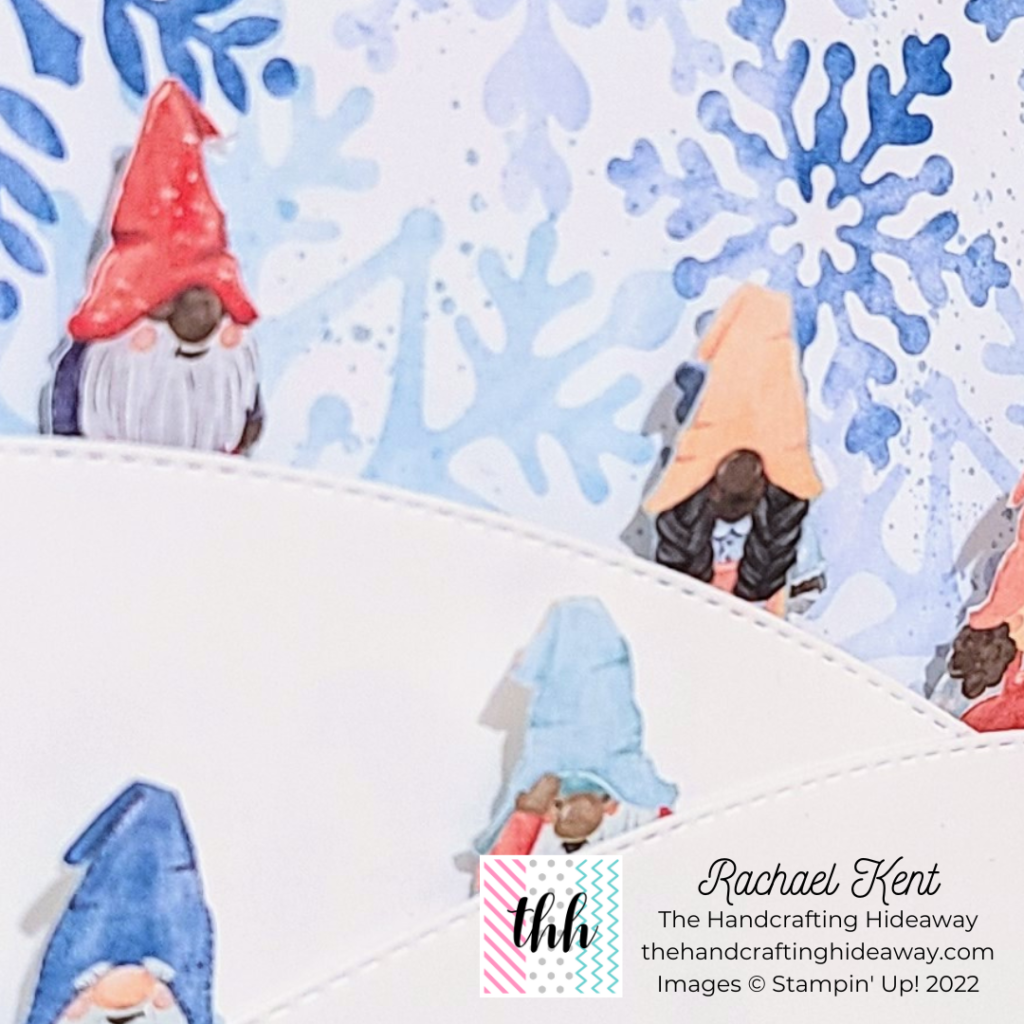
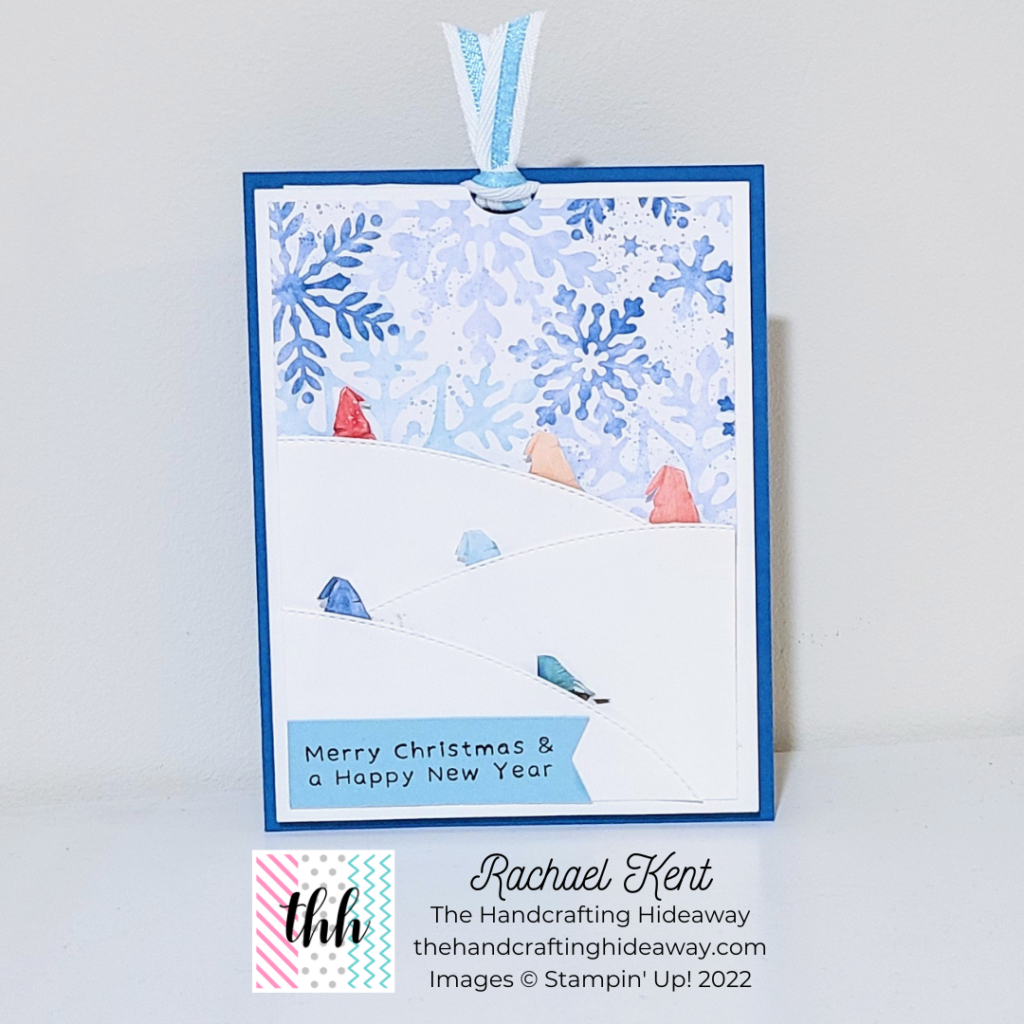
As you might have guessed, today we are challenged to make a Christmas themed card. I chose to use the adorable Kindest Gnomes stamp set and Storybook Gnomes Designer Series Paper.
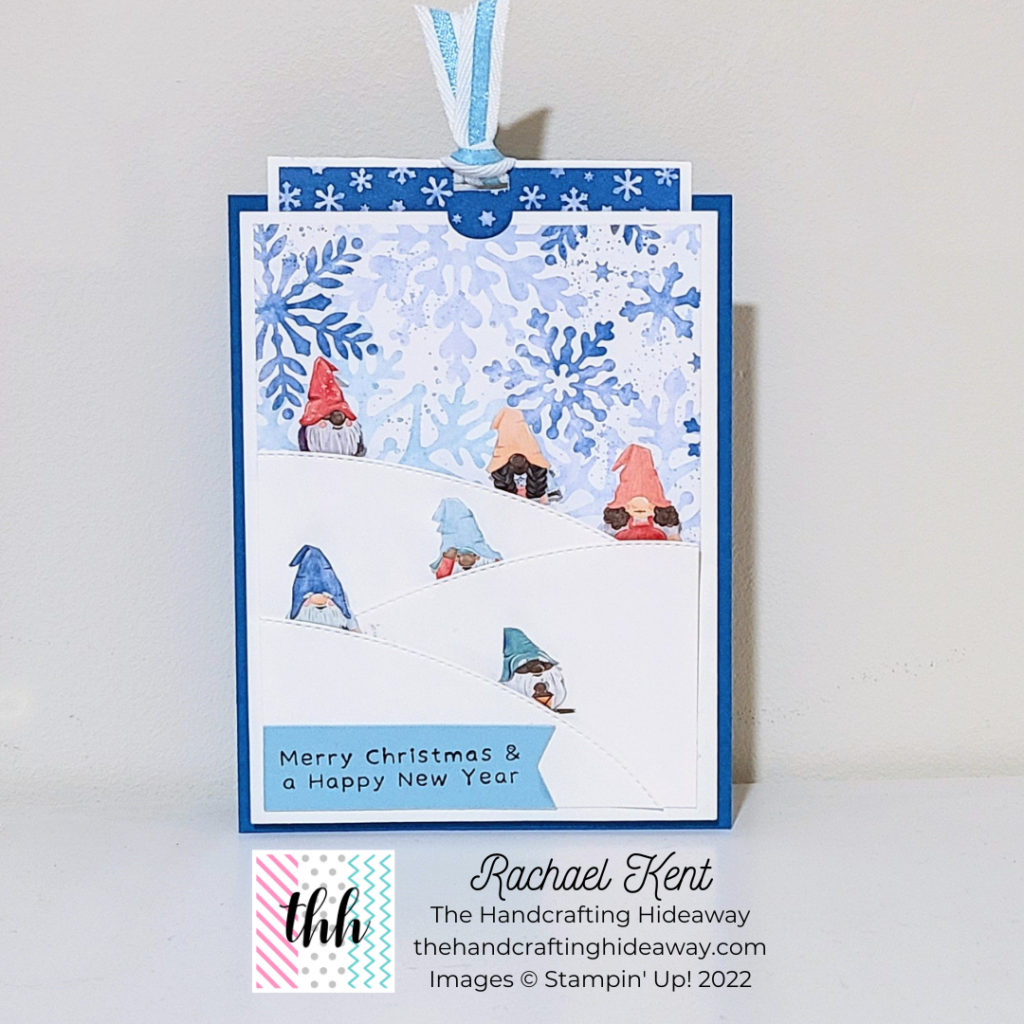
I had so much fun making this card. It took some trial and error to get the sliding gnomes to work properly, but I finally figured it out.
Below you will find the supplies list and the instructions for making this super fun gnome slider card. If you prefer a printable version of the instructions, download this file:
Supplies
- Cardstock:
- Pacific Point (8-½”x5-½” base; score at 4-¼”)
- Basic White (5-¼”x4″ front mat, 5-¼”x4″ interior mat, 5″x3-½” slider mat, various sizes for hills, small pieces for attaching gnomes through the holes)
- Balmy Blue (strip for sentiment)
- DSP:
- Storybook Gnomes 12″x12″ DSP (large snowflake pattern for front 3-¾”x2-⅞”, small snowflake pattern for slider 3-⅜”x1-¼”, fussy cut small gnomes)
- Embellishments:
- Balmy Blue & White ⅜” Double-Stitched Ribbon
- Dies/Punches:
- Basic Borders Dies
- Gnomes Dies (or another small shape)
- Banners Pick a Punch
- Ink:
- Memento Tuxedo Black
- Tools:
- Paper Trimmer
- Paper Snips
- Stampin’ Cut & Emboss Machine
- Craft Blade/Exacto Knife
- Pencil
- Adhesives:
- Foam Adhesive Strips
- Mini Stampin’ Dimensionals
- Stampin’ Seal
Instructions
- Cut all cardstock and DSP pieces. Fussy cut gnomes out of DSP. Cut hills with Basic Borders Dies. The hills section will need to be the same width as the large snowflake DSP piece. (To avoid having to cut through so many layers when you cut the holes later, use the Basic Borders Dies to curve the bottoms of the 2nd and 3rd hills, but make sure to leave at least ¼” to tuck behind each hill.
- Adhere the large Snowflake DSP to the top of the front mat. Adhere the small snowflake DSP to the top of the slider mat. (Make sure to leave an even border at the top and sides.) Adhere Basic White interior mat to the inside of the card.
- Attach a small piece of white cardstock on top of the gnomes feet in order to have more sliding length. (I cut a little corner off at the tops of these white cardstock pieces so it wouldn’t be as visible when the gnomes slide up.)
- Place the slider mat on top of the front mat and trace the sides and bottom with a pencil. (This will give you the area in which your gnomes can be. You wont see these pencil lines once the hills are attached later.)
- Remove the slider mat, lay the hills where they will be on top of the front mat, and tuck the gnomes behind them where you plan to put them. Remove the hills, but leave the gnomes. Trace the bottom of the gnomes. (This will be where the gnomes are when the slider is at its lowest point and will be the bottom of the hole you cut out.)
- Remove the gnomes and put a dimensional on the back of each gnome at the bottom of the small white cardstock piece you attached to them earlier. (Make sure to leave the backing on the dimensional for now.)
- Lay the hills in their place again and put the gnomes where they will be when the slider is raised to its highest point. Remove the hills, but leave the gnomes again. With a pencil, mark right above where the dimensional lands on each gnome. (This will be the top of the holes we cut out.)
- Draw a rectangle that includes the bottom and top of the hole. Using your exacto knife, cut out the holes.
- Use the small oval die from the Fnomes Dies or some other small die shape or punch to create a cut out at the top of the front mat so you can use the slider later.
- Using the exacto knife, cut a slit centered toward the top of the slider mat. Attach ribbon through this slit.
- Put the slider mat behind the front mat. Make sure they are centered and that the tops are lined up. Remove the backing of the dimensionals from the gnomes and attach them to the slider mat at their LOWEST point THROUGH the holes you cut in the front mat.
- Lay the hills on top of the front mat again. If they are interfering withof any of the holes for the gnomes. Trace the hole outline with a pencil onto the interfering hill and cut out with exacto knife or Paper Snips. Once everything lines up and the hills aren’t interfering with the gnomes, start adhering the hills to the front mat. (I used Stampin’ Seal at the bottom of the hills and Stampin’ Dimensionals toward the tops of the hills. This allows for more sliding room for the gnomes.)
- Stamp sentiment on strip of Balmy Blue cardstock and use the Banners Pick a Punch on one end. Adhere at the bottom of the hills.
- Attach Foam Adhesive Strips on the back of the front mat at the bottom and sides only. Remove back from.Foam Adhesive Strips and adhere to front of card base.
Thank you so much for stopping by today! I hope you enjoyed this tutorial and make some slider cards of your own. Feel free to email me a picture or video of your creations and yours just might be featured in a future blog post or Instagram story!
As always, make sure to live life creatively!
❤️ Rachael Kent ❤️